Okta
To configure Appsmith to use Okta as a SAML provider, follow the steps below:
Prerequisites
-
A self-hosted Appsmith instance. See the installation guides for installing Appsmith.
-
Before setting up Single Sign-On (SSO), ensure that you have already configured a custom domain for your instance.
-
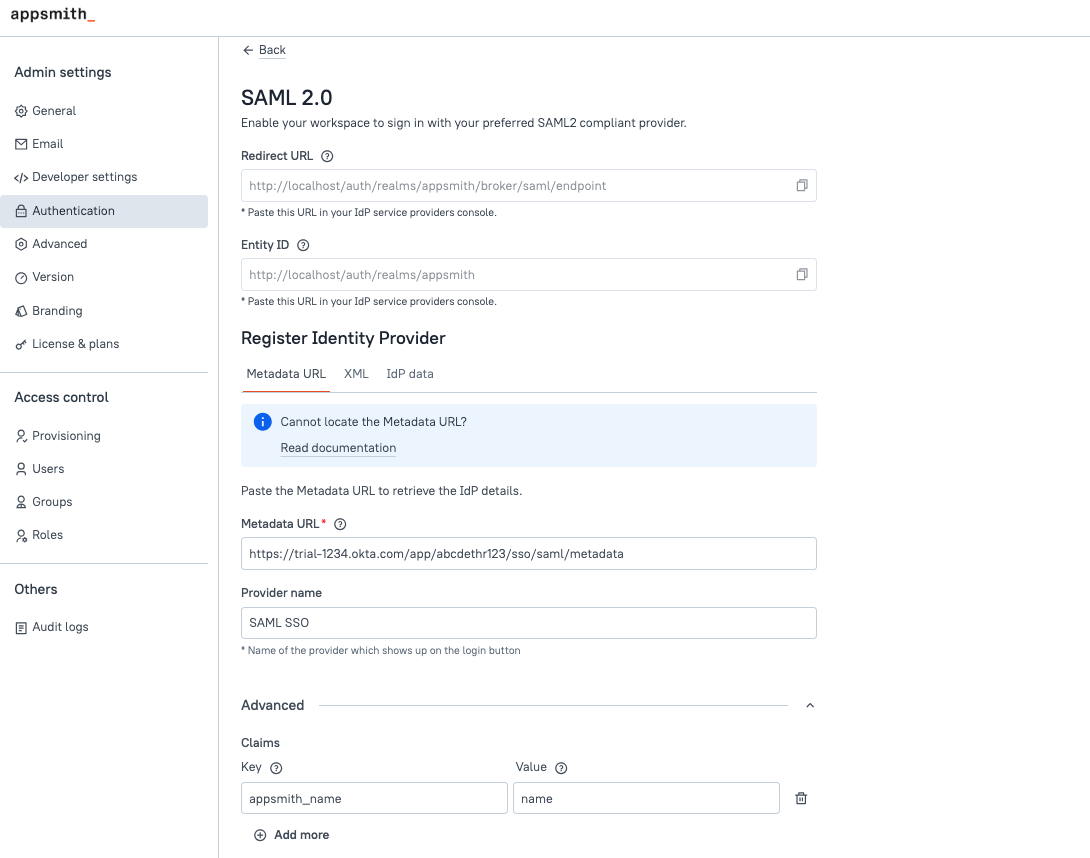
In Appsmith, go to Admin Settings > Authentication and click Enable on SAML 2.0.
-
Copy the Redirect URL and Entity ID from the SAML 2.0 configuration page to add them later in the Okta settings.
Create application on Okta
-
Log in to your Okta account and on the Get started with Okta page, click Add App for Use single sign on.
-
On the Browse App Integration Catalog page, click Create New App.
-
A pop-up titled Create a new app integration appears. Choose SAML 2.0 as the Sign-in method and click Next.
-
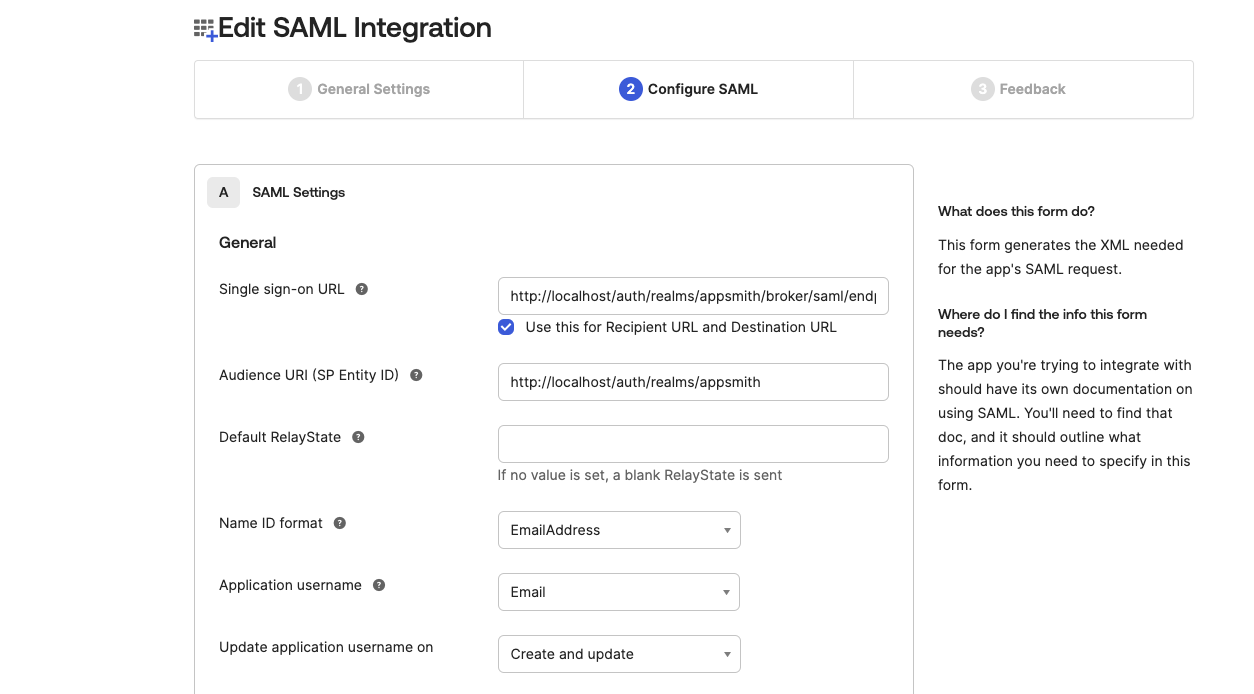
On the Create SAML Integration page, add a name for your app in General settings. Click Next.
-
In Configure SAML:
a. Add the Redirect URL in Single sign-on URL field.
b. Add the Entity ID in the Audience URI (SP Entity ID) field.
c. From the Name ID format options, select emailAddress.
d. Pick Email from the Application username options.
e. Click Next to proceed.
- If you are only interested in simple authentication via SAML, you can skip this step. However, if you want to configure custom claims, follow the steps below:
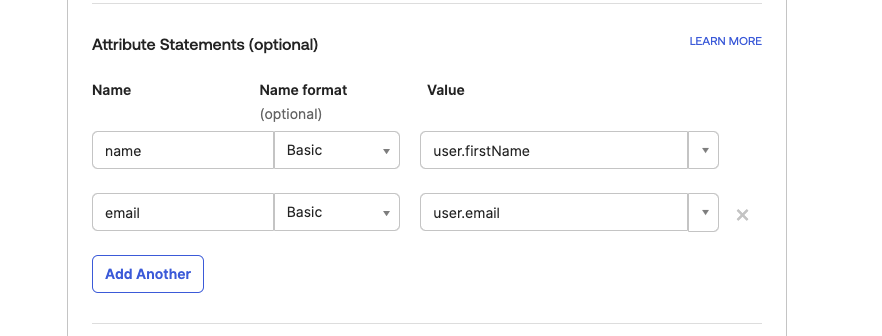
In the Attribute Statements section, add your custom attributes:
-
Name: Enter the attribute name in the desired format (e.g.,
firstName,lastName,email). Copy the claim name to add it later in the Appsmith SAML configurations. -
Name Format: Select a Name format. This is the format that the Name attribute is provided to your app:
-
Value: Choose the corresponding value from the predefined list (e.g.,
user.firstName, oruser.email).
-
Fill in the required feedback or additional information in the final step and click Finish.
-
On your application's homepage, go to the Sign-on tab and copy the Metadata URL from the SAML 2.0 section to add it later in the SAML configurations in Appsmith.
-
Go to the Assignments tab, and click Assign to assign people or groups to this application.
Register Okta in Appsmith
If you are running Appsmith on Google Cloud Run or AWS ECS, make sure to configure your service before setting up SSO. For detailed instructions, see the Configure Google Cloud Run for SSO, or Create PostgreSQL RDS for SAML SSO guide.
To complete the SAML configuration, you have to register the identity provider on Appsmith. Appsmith provides three options to register the identity provider as mentioned below:
- Metadata URL (recommended)
- Metadata XML
- IdP Data
To register Okta as the identity provider on Appsmith, follow the steps below:
-
Go to the SAML 2.0 configuration page in Appsmith and navigate to Register Identity Provider section.
-
Add the copied Metadata URL in the Metadata URL field under the Register Identity Provider section.
-
To configure custom SAML claims (if added in the Okta's Attribute Statements) in Appsmith, Click the Advanced section.
a. For each custom claim, enter a name in the Key field that references the custom SAML claim within Appsmith.
b. In the Value field, enter the exact claim name that you copied from the Okta's Attribute Statements section.
To set up SAML using the raw Metadata XML file, follow the steps below:
-
Open the copied Metadata URL in a browser tab and copy the XML content.
-
Navigate to Appsmith and add the raw XML in the Metadata XML field under the Register Identity Provider section in the SAML 2.0 configuration page.
-
To configure custom SAML claims (if added in the Okta's Attribute Statements) in Appsmith, Click the Advanced section.
a. For each custom claim, enter a name in the Key field that references the custom SAML claim within Appsmith.
b. In the Value field, enter the exact claim name that you copied from the Okta's Attribute Statements section.
If you have Identity provider data like X509 Public Certificate, Email, you can choose this option to configure SAML.
-
Open the Metadata URL in a browser tab or open the Metadata XML file.
-
Add the following values from XML tags in IdP Data under the Register Identity Provider section in the Appsmith SAML 2.0 configuration page:
IdP Data Field | Metadata XML Tag |
|---|---|
| Entity ID | Enter the value of the entityID attribute specified in the <EntityDescriptor> tag. |
| Single Sign-On URL | Enter the value of location attribute specified in the <SingleSignOnService> tag. |
| X509 Public Certificate | Enter the value specified in the <X509Certificate> tag. |
Enter the value specified in the <NameIDFormat> tag. |
- To configure custom SAML claims (if added in the Okta's Attribute Statements) in Appsmith, Click the Advanced section.
a. For each custom claim, enter a name in the Key field that references the custom SAML claim within Appsmith.
b. In the Value field, enter the exact claim name that you copied from the Okta's Attribute Statements section.
Once you have added the details, click the SAVE & RESTART button to save the configuration and restart the instance.
After the Appsmith instance restarts, try logging in again to your account. You'll see a login screen with the SIGN IN WITH SAML SSO button.

Troubleshooting
If you are facing issues contact the support team using the chat widget at the bottom right of this page.